1. Who would be the audience for your media production?
My audience for my film trailer was aimed at those who enjoy films from the horror genre. The age range of my film trailer was people over the age of 15 I done this as my trailer involves blood and a gun. I felt this was a suitable age, however didn’t involved no sex or violence which would make it an 18 film. On the other hand my film trailer may appeal to young danger as a warning about drink driving, as you could also be haunted too…
2. How did you attract/address your audience? (Did you create your outcome in a certain way to appeal to a certain audience/group?)
I used to common codes and conventions of a horror film trailer. However I also adding mystery into the theme, giving the trailer more suspense in itself. I used the stereotypical theme of blood within my horror theme. However it wasn’t ‘gory’. There was also small elements of horror with the spirits (Alastor). Alastor was one of the main characters along side Shaun, whom of which were haunted by demons. My film trailer had the hidden message of don’t drink and drive. However only active audiences would pick up on this. I didn’t want to make the moral of the story obvious as I wanted to audience to think. In addition the trailer leave many questions open, such as “who’s fault was the car crash” and “Is Alastor actually there, or is the guilt causing Shaun becoming mentally insane’
3. What have you learnt about technologies from the process of constructing this production? (Photoshop, camera use, Premiere Pro, etc)
I had to use lots of different programs for this project especially when editing in order to complete my project. I have learnt another way to extract footage (through a DVD player instead of a computer). I also learnt how to change the pitch and add echo’s to my audio in Audition. Adding an echo to the countdown at the end sounded so much better than the original and added to the ere effect given off within the scene.
4. Looking back at your project, what do you feel you have learnt in the progression from research, to planning to the full production?
The main thing I have learnt from this is that planning is key. You should always look at more ways than just one. I found this out through my project, where I had planned then went back and re-planned because I wasn’t happy with the outcome. I felt that planning my time well helped as I gave myself a lot of time to edit my final piece. As I had done lots of detailed planning e.g. storyboarding, script and shots list, I knew exactly what to do when it came to filming, therefore making the process go a lot smoother and quicker than initially thought. I wanted most of the footage the be my own, so I looked at various online tutorials in order for me to complete my work. I think that because I done a few hours of editing each day or night, I could break down the work, making it easier to cope with and finishing the final product quicker than I expected.
5. How did you feel the project progressed as whole? (Did you come across any difficulties? Did the project change entirely at any point?)
Initially I planned to do a fashion show with two others, however this didn’t work out and come the middle of April, we all came to the decision to do our own thing as we were running out of time and it was getting closer to our deadline. This is when I decided to do a film trailer, as this is something I haven’t done yet in college and I could show off all the camera and software techniques I had learnt over the past 2 years. I struggled at first coming up with a new idea, but after a while and being inspired with different objects and media around me, the idea came to me. The planning process took me a while, as I had to start again from the beginning however it was straightforward to fill in a few boxes. Once I had got my entire planning documents out of the way I could begin filming. The whole filming process only took 2 days. I think this happened because I had spent so much time on planning I knew exactly what I wanted to see and what I wanted to do. I had a few issues with editing (the computer being temperamental) and some days I wanted to just give up, however I thought against this and carried on, as I was determined to get the outcome that I had planned out to do. I did cut some scenes out of my trailer which I had planned to put in for example the news reporting, I felt that the piece on a whole worked without it, if I was making a short film then I would have used it, but I felt it was giving away too much in the trailer and I wanted to keep the audience thinking.
6. Examples of Media similar to my film trailer
Film trailers can be promoted in a variety of different ways such as posters, and advertisements either shown at the cinema or on our televisions. The film trailer most similar to mine is The Six Sense. I got a lot of inspiration from this film that I incorporated within my own film trailer, for example the little boy can see dead people. This was the main aspect to my trailer. I addition I also got inspiration from the Enfield Haunting that was shown recently on the TV. This program included different way that ghosts and spirits haunted a family. I really liked the idea of people being tormented within a horror film as this add suspense to the film as the audience are unaware of what happens next, therefore having to keep their ears opened and eyes peeling in order not to miss the best scenes. Finally there are some aspects from The Conjuring featured within my film trailer. In The Conjuring the element of the film is that certain individuals can see the living dead and communicate to the other side. I didn’t have the communication element where on character went to the ‘other side’ however this can be considered in the future. Instead I had the main character (Shaun) being able to see the dead (Alastor).
There are many different film posters out there to promote a film. Horror posters are normally dark and spooky and will feature either a main spooky character or a body part. In addition film posters such as Dark Ride, The Fun Park and Manic include more blood and gore on the poster.


Film posters that are similar to mine are these below:
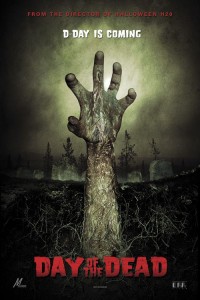


These are similar to my film poster because they all feature a hand or arm within their film poster to illustrate the main characteristics of the film. I used these three as examples against my work because they all use bold, horror font comonly red or with a shadow to add to the spooky effect and a bold image that automatically strikes the audience’s attention and send them a vital hidden message related to the film. The lighting is dark on each poster and they are simple but dramatic as there is not a lot going on around the main image, therefore the central image draws in all our attention. Two of these film posters have the hands coming up from the ground insinuating that the ‘living dead’ are coming back from the dead and are ready for a fight. I took elements from the first two film posters, the elements of a hand to draw attention straight to the poster, this makes my poster simular to the first two. However my hands aren’t coming from the ground, instead my hands are trapped behind ‘closed doors’. This is how my film poster is different to these film posters. However I think my film poster is more like Ponty Pool. Both my own poster and Ponty pool feature people being trapped as we can see from the image of the hands being trapped. The moral of my film trailer was Shaun having Alastor stuck in his mind after the crash and Shaun feeling trapped and isolated from the outside world. This is the message that the audience can see from my film poster before analysing the poster fully.
7. Create a list of action points which you will take into the next project (This could be to work quicker, be on time, plan more precisely, etc)
- Have more time initially for the project
- Get professional actors
- Better camera (more up top date)
- Look at more examples


